Create animated responsive multi step form with progress bar using jQuery HTML, CSS
If your signup form is big then It is good idea to divide user signup form in multiple parts. It’ll also improve user experience, As you have seen on many websites because Now a days multi-step form become more popular than regular forms. Tt more user friendly and convenient for new user. It provides step by step procedure so that new user can easily follow these steps and get registered quickly.
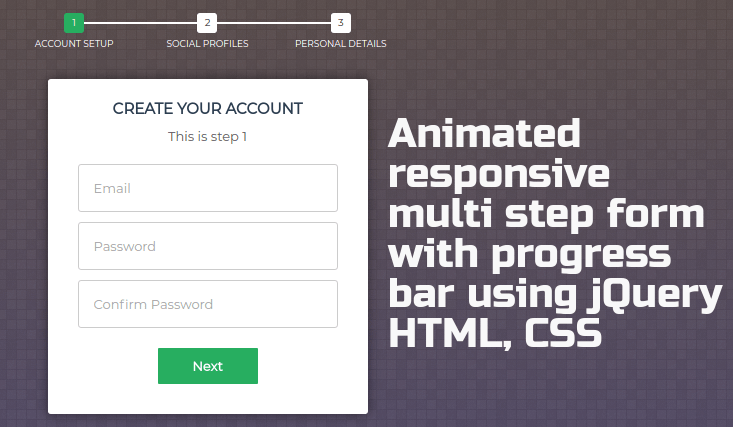
Creating responsive multi step form with progress bar
Follow following steps two create quick multi step form with progress bar using jQuery HTML, CSS
HTML
Create structure form your multi step form in html, Very first you need to create a form with fieldset tag in HTML, number of fieldset depends upon the steps you want to create. Also display progress bar.
<!-- multistep form --> <form id="msform"> <!-- progressbar --> <ul id="progressbar"> <li class="active">Account Setup</li> <li>Social Profiles</li> <li>Personal Details</li> </ul> <!-- fieldsets --> <fieldset> <h2 class="fs-title">Create your account</h2> <h3 class="fs-subtitle">This is step 1</h3> <input type="text" name="email" placeholder="Email" /> <input type="password" name="pass" placeholder="Password" /> <input type="password" name="cpass" placeholder="Confirm Password" /> <input type="button" name="next" class="next action-button" value="Next" /> </fieldset> <fieldset> <h2 class="fs-title">Social Profiles</h2> <h3 class="fs-subtitle">Your presence on the social network</h3> <input type="text" name="twitter" placeholder="Twitter" /> <input type="text" name="facebook" placeholder="Facebook" /> <input type="text" name="gplus" placeholder="Google Plus" /> <input type="button" name="previous" class="previous action-button" value="Previous" /> <input type="button" name="next" class="next action-button" value="Next" /> </fieldset> <fieldset> <h2 class="fs-title">Personal Details</h2> <h3 class="fs-subtitle">We will never sell it</h3> <input type="text" name="fname" placeholder="First Name" /> <input type="text" name="lname" placeholder="Last Name" /> <input type="text" name="phone" placeholder="Phone" /> <textarea name="address" placeholder="Address"></textarea> <input type="button" name="previous" class="previous action-button" value="Previous" /> <input type="submit" name="submit" class="submit action-button" value="Submit" /> </fieldset> </form> |
CSS
Then styling the fieldset, inputs, buttons and other form elements and add some style to progress-bar and and progress-bar connectors.
<style> /*custom font*/ @import url(http://fonts.googleapis.com/css?family=Montserrat); /*basic reset*/ * {margin: 0; padding: 0;} html { height: 100%; /*Image only BG fallback*/ background: url('gs.png'); /*background = gradient + image pattern combo*/ background: linear-gradient(rgba(196, 102, 0, 0.2), rgba(155, 89, 182, 0.2)), url('gs.png'); } body { font-family: montserrat, arial, verdana; } /*form styles*/ #msform { width: 400px; margin: 50px auto; text-align: center; position: relative; } #msform fieldset { background: white; border: 0 none; border-radius: 3px; box-shadow: 0 0 15px 1px rgba(0, 0, 0, 0.4); padding: 20px 30px; box-sizing: border-box; width: 80%; margin: 0 10%; /*stacking fieldsets above each other*/ position: absolute; } /*Hide all except first fieldset*/ #msform fieldset:not(:first-of-type) { display: none; } /*inputs*/ #msform input, #msform textarea { padding: 15px; border: 1px solid #ccc; border-radius: 3px; margin-bottom: 10px; width: 100%; box-sizing: border-box; font-family: montserrat; color: #2C3E50; font-size: 13px; } /*buttons*/ #msform .action-button { width: 100px; background: #27AE60; font-weight: bold; color: white; border: 0 none; border-radius: 1px; cursor: pointer; padding: 10px 5px; margin: 10px 5px; } #msform .action-button:hover, #msform .action-button:focus { box-shadow: 0 0 0 2px white, 0 0 0 3px #27AE60; } /*headings*/ .fs-title { font-size: 15px; text-transform: uppercase; color: #2C3E50; margin-bottom: 10px; } .fs-subtitle { font-weight: normal; font-size: 13px; color: #666; margin-bottom: 20px; } /*progressbar*/ #progressbar { margin-bottom: 30px; overflow: hidden; /*CSS counters to number the steps*/ counter-reset: step; } #progressbar li { list-style-type: none; color: white; text-transform: uppercase; font-size: 9px; width: 33.33%; float: left; position: relative; } #progressbar li:before { content: counter(step); counter-increment: step; width: 20px; line-height: 20px; display: block; font-size: 10px; color: #333; background: white; border-radius: 3px; margin: 0 auto 5px auto; } /*progressbar connectors*/ #progressbar li:after { content: ''; width: 100%; height: 2px; background: white; position: absolute; left: -50%; top: 9px; z-index: -1; /*put it behind the numbers*/ } #progressbar li:first-child:after { /*connector not needed before the first step*/ content: none; } /*marking active/completed steps green*/ /*The number of the step and the connector before it = green*/ #progressbar li.active:before, #progressbar li.active:after{ background: #27AE60; color: white; } </style> |
JS
Finally, add jquery on page for handing events and adding animation on next and previous form. Remember it’ll display selected form at the moment not all.
<script> $(function() { //jQuery time var current_fs, next_fs, previous_fs; //fieldsets var left, opacity, scale; //fieldset properties which we will animate var animating; //flag to prevent quick multi-click glitches $(".next").click(function(){ if(animating) return false; animating = true; current_fs = $(this).parent(); next_fs = $(this).parent().next(); //activate next step on progressbar using the index of next_fs $("#progressbar li").eq($("fieldset").index(next_fs)).addClass("active"); //show the next fieldset next_fs.show(); //hide the current fieldset with style current_fs.animate({opacity: 0}, { step: function(now, mx) { //as the opacity of current_fs reduces to 0 - stored in "now" //1. scale current_fs down to 80% scale = 1 - (1 - now) * 0.2; //2. bring next_fs from the right(50%) left = (now * 50)+"%"; //3. increase opacity of next_fs to 1 as it moves in opacity = 1 - now; current_fs.css({'transform': 'scale('+scale+')'}); next_fs.css({'left': left, 'opacity': opacity}); }, duration: 800, complete: function(){ current_fs.hide(); animating = false; }, //this comes from the custom easing plugin easing: 'easeInOutBack' }); }); $(".previous").click(function(){ if(animating) return false; animating = true; current_fs = $(this).parent(); previous_fs = $(this).parent().prev(); //de-activate current step on progressbar $("#progressbar li").eq($("fieldset").index(current_fs)).removeClass("active"); //show the previous fieldset previous_fs.show(); //hide the current fieldset with style current_fs.animate({opacity: 0}, { step: function(now, mx) { //as the opacity of current_fs reduces to 0 - stored in "now" //1. scale previous_fs from 80% to 100% scale = 0.8 + (1 - now) * 0.2; //2. take current_fs to the right(50%) - from 0% left = ((1-now) * 50)+"%"; //3. increase opacity of previous_fs to 1 as it moves in opacity = 1 - now; current_fs.css({'left': left}); previous_fs.css({'transform': 'scale('+scale+')', 'opacity': opacity}); }, duration: 800, complete: function(){ current_fs.hide(); animating = false; }, //this comes from the custom easing plugin easing: 'easeInOutBack' }); }); $(".submit").click(function(){ return false; }) }); </script> |
See live demo and download source code.
DEMO | DOWNLOAD
See official github repository for more information and follow for future updates. Don’t forget to read license for using above plugin in your commercial project.